Eva from Sweet Sins is our host for bread baking day #6. Her challenging theme: shaped breads.
This immediately reminded me of a bread I had seen in a little book of the Italian sisters Simili: Sfida al matterello, which tells you how to make good home made italian pasta. Bread in a pasta book? Yes – because it’s a very special bread using the techniques teached in the book.
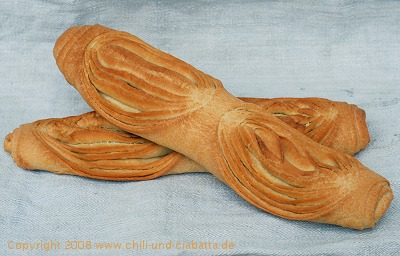
Pan de Hojaldre or Pane sfogliato, a bread from Valencia.
Here comes a little photo tutorial:

The kneaded dough is shaped into rolls of about 20 cm length (I doubled the recipe in the book and made 2 breads).

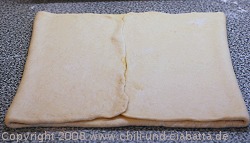
Roll out the dough into a rectangle of about 20×50 cm. Pour 15 ml olive oil onto the dough and spread it evenly, leaving out the edges.
Fold the 2 short sides into the middle, sealing the edges.
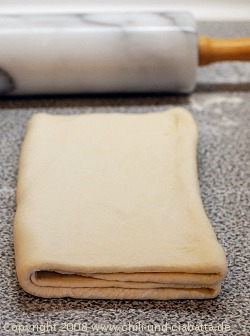
Fold the dough in half, you will now have 4 layers.
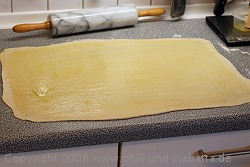
Carefully roll out the folded dough into a square of 60×40 cm. Spread again 15 ml olive oil.
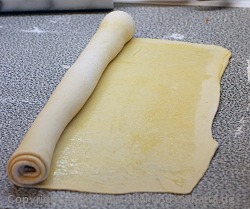
Roll the dough from the short end without tightening it too much.

With a sharp knife make two deep slashes into the bread, leaving the middle intact.
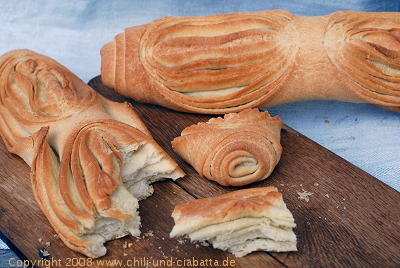
The finished loaves: you can easily see the single layers. The bread has a lot of crunchy crust and tastes very good. I would rather break than cut it.
Hinweis: Das Rezept auf Deutsch gibt es hier in meinem Brotkasten.
| ========== | REZKONV-Rezept – RezkonvSuite v1.4 |
| Titel: | Pan de Hojaldre – Pane sfogliato |
| Kategorien: | Bread, Spain |
| Menge: | 1 Bread |
Zutaten
| H | PRE-DOUGH | ||
| 50 | Gramm | All purpose flour | |
| 30 | Gramm | Water | |
| 2 | Gramm | Fresh yeast | |
| H | FINAL DOUGH | ||
| 250 | Gramm | All purpose flour | |
| 125 | Gramm | Water | |
| 10 | Gramm | Fresh yeast | |
| 1/2 | Essl. | Olive oil | |
| 5 | Gramm | Salt | |
| 30 | Gramm | Olive oil, divided | |
Quelle
| adapted from | |
| Sorelle Simili | |
| Sfida al materello |
| Erfasst *RK* 14.01.2008 von | |
| Petra Holzapfel |
Zubereitung
Mix the ingredients for the pre-dough, form a ball and put it into a bowl. Cover and let rise until doubled (1-1 1/2 hours).
Mix flour, water, yeast and the pre-dough adding olive oil and salt. Don’t overwork the dough. Form a roll of about 20 cm length and let rest covered on the working surface for about 15-20 minutes.
On the floured working surface roll out the dough into a square of 20×50 cm. Pour 15 ml olive oil onto the dough and spread it evenly leaving out the edges. Fold the two short sides into the middle. Press the edges to seal. Fold again like you would close a book you now have 4 layers.
Flour your working surface and carefully roll out the dough into a rectangle of 60×40 cm (a little bit of oil may ooze out – that doesn’t matter).
Pour another 15 ml olive oil onto the dough and spread it evenly leaving out the edges. Beginning from the short side roll the dough without tightening it too much.
Lay the roll seam side down onto a baking tray covered with baking paper. With a sharp knife make two deep slashes into the roll leaving in the middle about 3 cm intact.
Brush the roll with a little bit of olive oil, cover and let ferment until doubled (45-90 minutes).
Preheat the oven to 200°C.
Bake the bread for about 30-35 minutes.
Let cool on a roast.
The recipe can easily be doubled.
=====
The result looks really very promising. Congratulations 🙂
Ulli
Just like a puff pastry bread – looks great! One of these days I have to try this technique either sweet or savoury… Thanks for participating!
Es ist doch immer wieder erstaunlich was den Brotkünstlern alles eingefallen ist und auch noch einfällt. Es ist sehr schön geworden und super dokumentiert, danke Petra!
Sieht sehr chic aus!!!!
UNd, eigentlich viel viel schöner als Blätterteig….finde ich ( und auch einfacher), wie ein Fächer. Als Brot kannte ich den Teig noch nicht…..
Das sieht total klasse aus! Ich würde gerne mal wieder Brot backen, du hast sooo viele Rezepte, die ich auch mal gerne backen würde…
Die Fotodokumentation ist auch klasse, weil es durch die Bilder einfacher wird. Wortbeschreibungen sind da meist unverständlich.
Liebe Grüße
Uiii, sieht des Klasse aus. Wenn ich mir vorstelle, dass es so gut schmeckt, wie es aussieht…
Sehen sehr einladend aus. Erinnern mich ein wenig an „dänische Brötchen“, bei denen Fett in Brötchenteig eingetourt wird (dort vermutlich Butter).
Sieht klasse aus, aber meine Herren würden sich über Aussehen und Größe der Brotscheiben mokieren 😉
boah! sieht super super aus! ich zerschmelze hier gerade vor neid!
Petra, schon wieder ein Meisterwerk! Und so toll mit Fotos versehen, das liebe ich. Eine Frage: am Wochenende habe ich Gäste. Vor dem Hauptgericht biete ich marinierte rote Bete und Feldsalat an (mit einem Walnuss-Balsamico-Dressing). Würde das Brot dazu passen? Wenn es mir so gelingen würde, dann wäre das ja ein echter Hingucker…
Die Brote sind toll geworden. Sie stehen auch schon lange auf meiner Nachbackliste. Mit deiner schönen Anleitung steht ja eigentlich nichts mehr im Wege, ausser die anderen x1000 Rezepte, die ich noch ausprobieren möchte. 😉
Wie schön! Die Maïländer Schleife, die ich vorhin gekauft habe, sieht aber plötzlich extrem langweilig aus.
Sehr schön!!!!
Vielen Danke für Eure netten Kommentare!
@Jutta,
ich weiß nicht, ob das Brot so gut zu deiner (sehr lecker klingenden) Vorspeise passt – das ist natürlich deinen Vorlieben überlassen. Es hat relativ wenig weichen Krumenanteil, dafür viel leckere Kruste. Ich kann es mir hervorragend zu einer italienischen Vorspeisenplatte mit Wurst und Schinken vorstellen, oder zu einem Käseteller.
Hallo Petra,
Danke für die schnelle Antwort. Ich werde mich jetzt aufmachen, das Brot zu Testzwecken zu backen. Bin gespannt und freue mich schon auf das Ergebnis!
Habe am Wochenende Dein Brot nachgebacken. Herausgekommen ist ein wirklich leckeres und auch sehr ansehnliches Werk. Vielen Dank für das tolle Rezept. Insbesonders die bebilderte Anleitung hat das Nachbacken zu einem Kinderspiel gemacht!
Vielen Dank für das Rezept. Das Nachbacken hat viel Freude gemacht, das Ergebnis noch mehr. Ich habe Dinkelmehl 630 genommen, weil nichts anderes da war. Das hat wunderbar funktioniert, der Rest war sogar am nächsten Tag noch knusprig. Das Brot kam in Begleitung von im Ofen gebackenen Pilzen, italienischem Schinken und Oliven auf den Tisch und erntete grosses Lob. Ich denke über ein Experiment mit Kräutern und Knoblauch in den verschiedenen Schichten nach.
Hallo d’Sparil,
freut mich, wenn die Anleitung so eindeutig ist!
Hallo grüner Tisch,
gut zu hören, dass es auch mit Dinkel funktioniert. Das Essen klingt ja herrlich! Kräuter und Knoblauch passt sicher – sogar Käse (Parmesan) könnte man ausprobieren.
Wow, what an interesting technique and the result is amazing. Thank you for the very clear photos — I’ll be trying this soon.
Just gorgeous Petra! I love bread that are like a puzzle to be solved!
That is amazing!! I love the look of it – all those extra crispy bits. Beautiful job!
-Elizabeth
ciao Petra, I’ve made the same bread!!
http://isabilla.blogspot.com/2007/12/gli-auguri-e-la-mia-cucina-il-giorno-di.html
very very interesting bread 🙂
ich hab es nachgebacken! Das doppelte Rezept, und das eine Brot habe ich mit Bärlauch gefüllt. Leider war es ein bisschen zu wenig, sodass der Bärlauch nicht wirklich intensiv war. So oder so aber war es ein klasse Brot!
beim nächsten mal werde ich mit weiteren Füllungen experimentieren, zB. Knoblauchöl, Tomatenpesto etc. Sollte ja alles funktionieren… Danke für die Gute Anleitung!