Bread Baking is a wonderful hobby and over the last years I tried more than 200 different bread recipes. To remember the different sorts I began to take pictures of the loaves and collected the recipes at my website Petras Brotkasten. Since I have a blog you can find the newest recipes here.
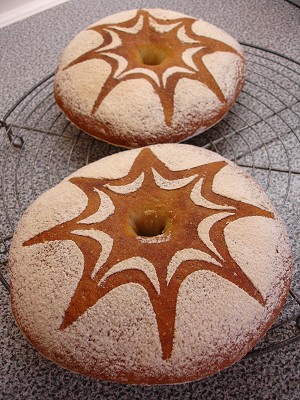
For the World Bread Day-Event promoted by the very dear Zorra on Kochtopf I present you probably not the best tasting bread I ever made but surely one of the most attractive looking loaves I ever baked:
The recipe comes from Brot – Pain, a very interesting book of the Fachschule Richemont in Switzerland intended for professional bakers. The recipe for this bread produces about 20 kg dough – so I had to cut it down for a yield of 2 breads which fit into my oven. The recipes are very short and therefore not suited for the beginner. They don’t even give baking times and only approximate temperatures. But if you have some experience in bread baking and like to play around a little bit you can have great success with breads from this book. Very helpful are photos of the forming and slashing of each bread, of the whole and the sliced loaves.
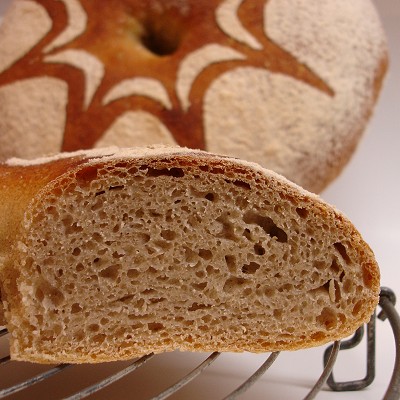
Besides wheat the bread I chose for today contains barley. While barley produces flour with a lower gluten content this dough isn’t as strong as a normal wheat-dough and the bread rings are rather flat. For a better taste this recipe uses fermented dough (Pâte fermentée).
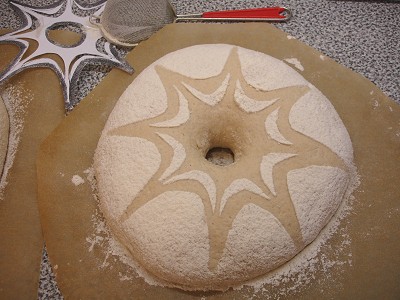
The special attractive look of this bread rings can be very easily achieved: just make a nice stencil paper, lay it on the unbaked loaves and sieve flour on the breads. Remove the stencil with care and bake the breads – voilà!
Das Rezept in Deutsch gibt es hier.
Technorati tag: world bread day ’06, worldbreadday06
-====  REZKONV-Recipe - RezkonvSuite v1.2.1

     Title: Barley Bread Rings
Categories: Bread
     Yield: 2 Breads

======================== PÂTE FERMENTEÉE ========================
    100     grams  Bread flour Type 812
     65     grams  Water
      3     grams  Fresh yeast
      2     grams  Salt

========================== PRE-FERMENT ==========================
    240     grams  Barley flour
      4     grams  Fresh yeast
     25     grams  Pâte fermentée
    220     grams  Water

========================== FINAL DOUGH ==========================
    265     grams  Bread flour Type 1050
    175     grams  Water
      9     grams  Fresh yeast
    489     grams  Pre-ferment
     14     grams  Salt

============================ SOURCE ============================
            adapted after a recipe from
            Fachschule Richemont
            Brot Pain
            -Edited *RK* 10/16/2006 by
            -Petra Holzapfel

takes 3 days

Pâte fermentée: Disperse the yeast in the water, add the flour and
salt and mix until a smooth dough forms. Let stand 1-2 hours at room
temperature, then cool it for up to 48 hours in the refrigerator.
Let come to room temperature before using.

For the pre-ferment disperse the yeast in the water, mix with barley
flour and pâte fermentée. Cover the bowl and let stand for 1 hour at
room temperature, then cool for 18-20 hours in the fridge. Let come
to room temperature before using.

For the final dough add bread flour type 1050, preferment and the
yeast water to the mixing bowl and mix on first speed for 3 minutes,
add the salt and mix for 6 minutes on second speed. The dough will
be rather loose and sticky. Let ferment covered in a lightly oiled
bowl for 90-120 minutes.

Divide the dough in two pieces. On a lightly floured work surface
shape into rounds. The dough is not very strong so the rounds will
be a little bit flat. Transfer the loaves to two sheets of baking
paper and flatten to about 17-18 cm diametre. With your fingers make
a whole in the middle and widen it to at least 4 cm diametre. Cover
the loaves and let rise for about 45-60 minutes.

Preheat the oven with a baking stone to 240°C.

If necessary widen the whole in the middle again a little bit with
wet fingers (dough is sticky).

If desired lay a stencil paper on the loaves and sieve flour onto
the bread. Carefully remove the stencil. Transfer the loaves still
on the baking paper to a peel and load the bread into the oven,
steam with 1 cup of water.

After 15 minutes remove the baking paper. Bake another 15 minutes
until brown. Let cool on a wire rack.

=====
Your bread looks absolutely awesome ans ever so yummy! I love the design! Thanks for sharing this recipe with us…
Was die Kunst des Brotbackens betrifft, nennt man das, was Du aus dem Ofen hervor gezaubert hast, vermutlich „state of the art“!
Wow, your bread look amazing, really good-looking!!
And I really don’t think it’s flat: it’s just like most ring-shape breads!!
Thank you for all these wonderful breads you bake and share with us (please, more recipes in english)!!
Herrlich sehen deine Brote aus! Gratulation, aber irgendwie sind wir das von dir ja gewohnt 😉
Wie ich schon bei Flickr schrieb, die Brote sehen einfach wunderschön aus.
Kann mich nur anschließen: Wirklich wunderschöne Brote!
I love all your Bread. I think this one is very special.
danke .(I think I’m lucky I can read the german language ,but I can’t write as well..) thank you very much 😉
Brot mit Reismehl
In der letzten Zeit bin ich wieder richtig im Brotbackfieber! Das ist zum einen den herbstlichen Temperaturen zu verdanken, zum anderen hat natürlich das World Bread Day-Event gelockt, wieder einige Rezepte neu auszuprobieren. Deshalb gibt’s hier in de…
Thanks for dropping by my blog and sympathising with my bread-making disaster. Your loaf (or should I say loaves, given how many you’ve posted), looks beautiful. Great idea re the stencil on top – really turns it into something special.
World Bread Day ’07: Sourdough Bread with Hulled Hemp
Of course it’s a great pleasure to follow Zorra’s invitation for Bread Baking Day 2007! In July I hosted a food blogger meeting. Ilka and Ulli from Rezkonv Suite Blog gave me flowers flours and hulled hemp seed which I
What a delightful loaf. I just made it and it is fabulous. I only had barley flakes, no barley flour, so I ground up enough of the flakes for the equivalent of barley flour in the recipe. Also did not have gluten and left it out. Used a ceramic baker and covered it about halfway through the baking time with some parchment paper. Thanks so much for the great recipe and thorough instructions!
mouth watering pics,love the blog.